Gunpla Seam Line Removal: Which Cement, $2.99 to $6.00
TL;DR: Fit the halves, run cement along the join, let it dry hard, sand with 400 then 1000 grit, and putty what is still visible. GSI Creos says its $2.99 Mr. Cement leaves resin after drying, which suits visible seam gaps; Tamiya's Extra Thin ($5.99 to $6.00) flows into tight joins. Checked Oct 24, 2026.
7 min readBy PlamoDesk Editorial
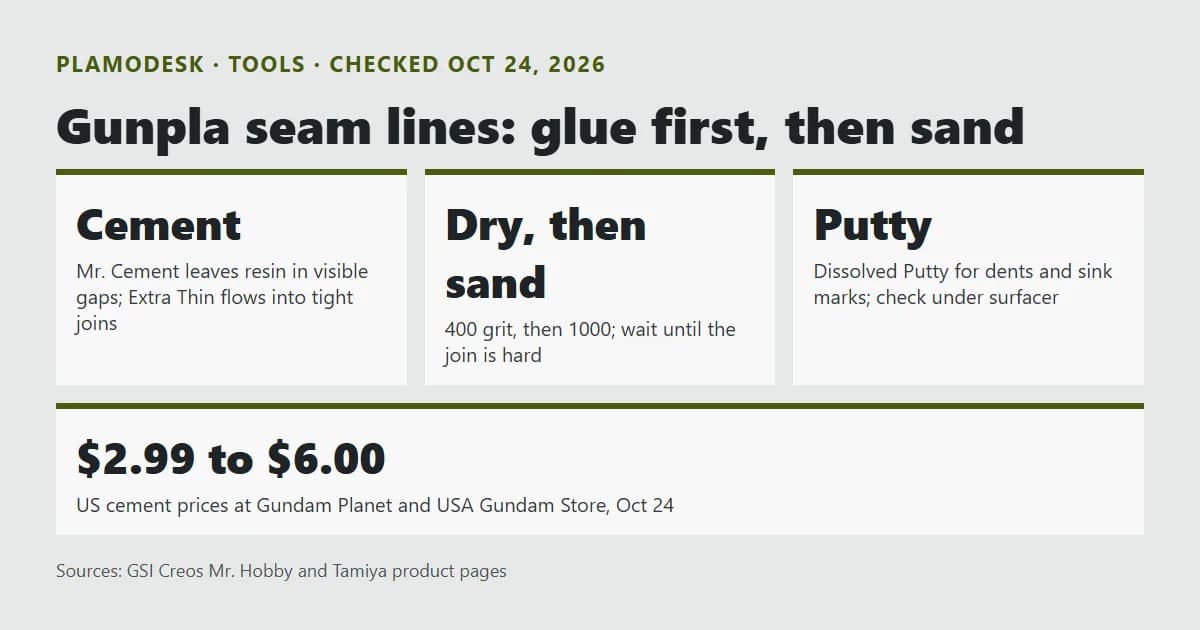
Glue, not sandpaper, is the first fix for a Gunpla seam line. Choose a cement that leaves something in the gap, or the line comes back after you sand, and decide before you start whether you will paint that part.
Gunpla seam line? (quick answer)
A seam line is the visible join where two halves of a part meet, such as an arm or a rifle. You remove it by cementing the halves so the gap fills, sanding flush once dry, and filling what remains. Pick Mr. Cement for a gappy join, Extra Thin for a tight one.
Key Takeaways
- Glue is the fix: GSI Creos says Mr. Cement leaves resin after drying, best where seam gaps show.
- Thin vs thick: Tamiya Extra Thin flows into small spaces between pre-fitted parts.
- Time to adjust: Mr. Cement S dries more slowly than SP, so you can line parts up.
- Putty for leftovers: Mr. Dissolved Putty fills dents and sink marks; Tamiya Basic Putty is not for large gaps.
- US prices, Oct 24: cements $2.99 to $6.00.
Overview: why seams need cement on snap-fit kits
Snap-fit Gunpla needs no glue to hold together. Seam removal is the exception, because you are deliberately making the two halves one piece. Once cemented, they no longer come apart, so paint or assemble inner parts first if the halves trap them.
GSI Creos describes its standard Mr. Cement (MC124) as a cement for polystyrene kits that contains acrylic resin, so it is viscous. Then the useful line: resin remains after drying, so it is best where seam gaps are noticeable or where you need strength (our translation).
The thin cements work differently. Tamiya's Extra Thin Cement (87038) "was developed to flow into and stick the small spaces between two plastic parts which have been pre-fitted to one another." GSI Creos's Mr. Cement S also flows into the gap by capillary action.
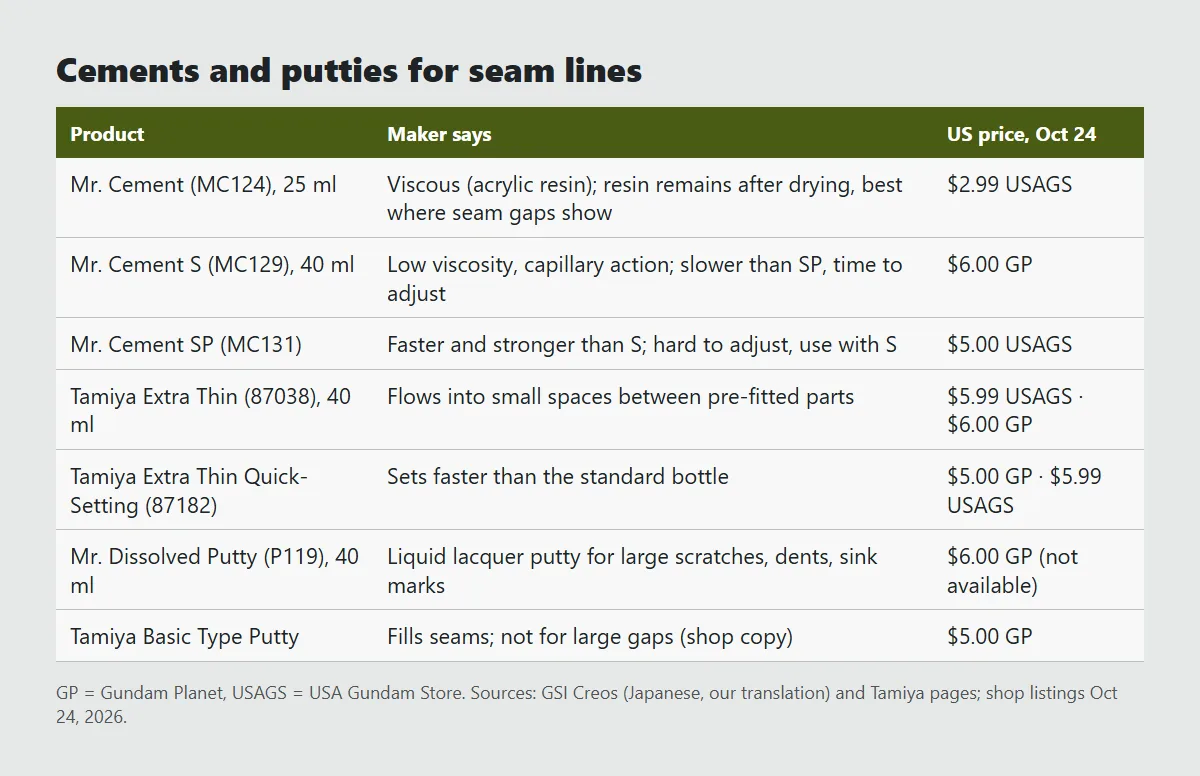 Diagram: PlamoDesk. Sources: GSI Creos Mr. Hobby pages (Japanese, our translation), Tamiya 87038 and 87182 pages, Gundam Planet and USA Gundam Store listings, Oct 24.
Desk note: On Oct 24, the cheapest cement and the cheapest putty at USA Gundam Store, MC124 and Mr. White Putty R, came to $5.98 together. That is less than one $6.00 bottle of Extra Thin at Gundam Planet. Seam work is cheap; the cost is time.
Step-by-Step: Gunpla seam line removal
1. Dry-fit the halves. Check that they close fully and nothing inside has to go in later.
2. Pick the cement for the gap. A tight join takes a thin, flowing cement. A visible gap takes Mr. Cement, which leaves resin behind.
3. Apply along the join. With Extra Thin, touch the brush to the closed seam and let it run in. Tamiya's 87038 has a pointed brush in the cap; Mr. Cement has one too.
4. Use the slow cement if you need to adjust. GSI Creos says Mr. Cement S dries more slowly than SP, so you can nudge the parts before it dries. SP is faster and stronger, and the maker suggests pairing it with S rather than using it alone.
5. Wait until the join is hard. No maker page we read gives minutes. Tamiya only says its Quick-Setting version (87182) sets faster than the standard bottle.
6. Sand flush, coarse to fine. GSI Creos sells Mr. Paper in #400, a slightly soft waterproof paper, and #1000. Tamiya's Sanding Sponge Sheet (87163) is P320 aluminum oxide on 5 mm sponge, "OK to use for wet sanding."
7. Fill what is left. Mr. Dissolved Putty is a liquid lacquer putty for large scratches, dents and sink marks, thicker than Mr. Surfacer 500, the maker says. Let it dry, sand again.
8. Check under surfacer. A dark gray coat shows what you missed. Our Gunpla surfacer guide explains which number to use.
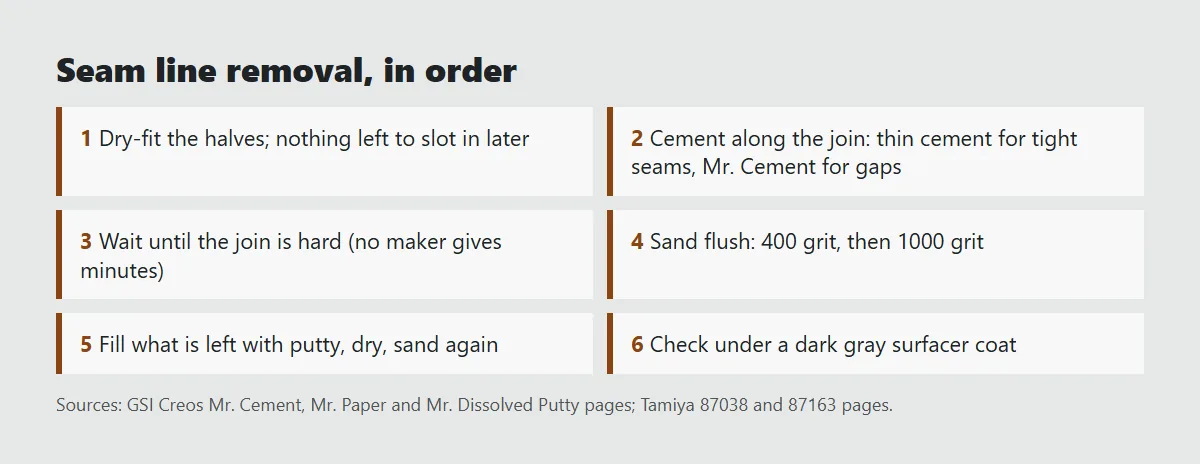 Diagram: PlamoDesk. Sources: GSI Creos Mr. Cement, Mr. Paper and Mr. Dissolved Putty pages; Tamiya 87038 and 87163 pages.
GODEEPER: The nippers and sanding sticks this job starts with. Gunpla tools guide →
Tips: seams without a mess
- Do not flood the join. A thin cement runs along the seam on its own. More is not better.
- Mind the order. Cemented halves are permanent, so check the manual for parts that slot in later.
- Small gap, small putty. Gundam Planet's copy for Tamiya Basic Type Putty says it is for "filling in seams" and "not intended to fill large gaps."
- Pin marks are the same job. The photo below is a car kit, not Gunpla, but the filled marks on its chassis show the stage before sanding.
- Expect to repaint. Sanding a molded-color part can leave it looking different from the parts around it. Plan seam work on parts you will paint or top coat.
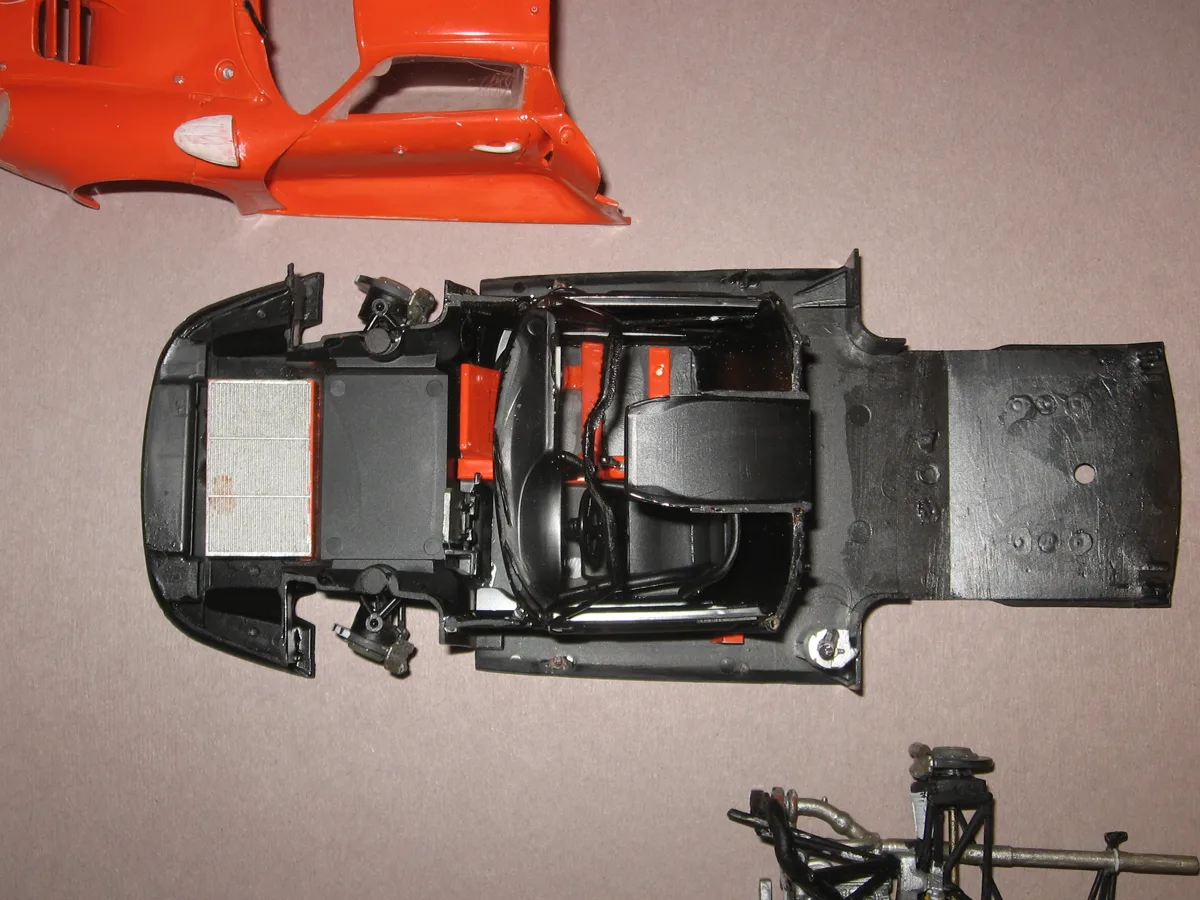 A Tamiya car kit, not Gunpla: filled marks on the chassis before sanding. Photo: Bill Abbott / Wikimedia Commons, CC BY-SA 2.0.
GODEEPER: If the halves are colored plastic, the next step is paint. Gundam Marker types →
What builders say
One r/Gunpla post from this week, read through Arctic Shift. A voice, not a source for the steps above.
"Mg Kampfer. Trying out a different path for seam line removal" … "Don't worry I'll shape to look better as I go, just wanted to get the cut made." u/Lurkadurkairka on r/Gunpla, October 2026
Cut first, shape later: the same coarse-to-fine order as the sanding step.
What we don't know yet: No GSI Creos or Tamiya page we read gives a drying time before sanding. Wait until the join is hard to the touch, and longer for a thick cement.
Our take
Start with $2.99 Mr. Cement for visible gaps and sand 400 then 1000; skip seam work on parts you will not paint. GSI Creos says that cement leaves resin in the gap, which is what you sand back to a clean line. Buy Extra Thin ($5.99 to $6.00) when your seams close tight. We recheck these prices with the next tools update.
How we checked this
On Oct 24, 2026 we read GSI Creos's Japanese pages for Mr. Cement, Mr. Cement S and SP, Mr. Dissolved Putty and Mr. Paper, Tamiya's pages for 87003, 87038, 87182 and 87163, and US listings at Gundam Planet and USA Gundam Store. A research assistant gathered the pages; we re-read the Mr. Cement page and USA Gundam Store's cement prices. Bandai's site was in maintenance. We did not test these products.
Frequently Asked Questions
How do you get rid of seam lines on Gunpla? Glue the two halves, let the cement dry, then sand the join flush. GSI Creos says its standard Mr. Cement leaves resin after drying, which makes it best where seam gaps show. Fill anything left with putty, then check under a coat of surfacer.
What glue is best for Gunpla seam lines? A cement that fills, such as Mr. Cement (MC124), which GSI Creos says leaves resin in visible seam gaps. It was $2.99 at USA Gundam Store on Oct 24, 2026. Thin flowing cements like Tamiya Extra Thin ($5.99 to $6.00) suit tight joins between pre-fitted parts.
Mr. Cement S or SP for seams? S if you need time to line up the halves. GSI Creos says Mr. Cement S dries more slowly than SP, so you can adjust the parts before it dries. SP dries faster and bonds stronger, and the maker suggests using it alongside S.
How long should cement dry before sanding a seam? None of the maker pages we read gives a time in minutes. GSI Creos only ranks its cements: S dries more slowly than SP, and Tamiya says its Quick-Setting Extra Thin Cement sets faster than the standard bottle. Sand only once the join is hard.
What putty fills Gunpla seam gaps? For a small seam, Tamiya Basic Type Putty; Gundam Planet's listing says it fills seams but not large gaps. For bigger scratches, dents and sink marks, GSI Creos sells Mr. Dissolved Putty, a liquid lacquer putty thicker than Mr. Surfacer 500.
Do I need to paint after removing seam lines? Usually, if the seam ran across a colored part. Sanding can scuff the molded surface, and a coat of surfacer and paint evens it out. A surfacer such as Mr. Surfacer 1000 also shows any seam you missed, its maker says, because its dark gray shows scratches.
Related Reading
- Gunpla Tools for Beginners: the first tools to buy before any seam work.
- Gunpla Weathering for Beginners: what to do once the surface is clean.
- HG vs RG vs MG: the same RX-78-2 in three grades.
- Best Gunpla Top Coat for Beginners: evening out sanded parts.
References
- GSI Creos Mr. Hobby (Japanese): Mr. Cement MC124, Mr. Cement S MC129, Mr. Cement SP MC131, Mr. Dissolved Putty P119, Mr. Paper #400, #1000
- Tamiya: Extra Thin Cement 87038, Cement 87003, Quick-Setting Extra Thin 87182, Sanding Sponge Sheet 87163
- Gundam Planet: Extra Thin Cement, Putty Basic Type
- USA Gundam Store: MC124 Mr. Cement, MC131 Mr. Cement SP
Ask the desk: a question about a kit, a release month or a price? Email contact@plamodesk.com. We answer in the article FAQ with the date, not by private reply (how it works).
Was this guide helpful?
Get the PlamoDesk newsletter
New kit months, grade guides and dated US prices by email.
About the author

Editorial desk
The PlamoDesk desk. We read Bandai's schedule and every item page, in English and Japanese, keep our own kit archive and check US shop prices on a stated day. We don't review kits we haven't built.
Keep reading
Hand Painting Gunpla: 3 Paint Types, 1:1 Thinner, $3.95
Tools · 7 min
Gunpla Weathering for Beginners: A $12.50 Palette, Then Oil
Tools · 7 min
Gunpla Surfacer vs Primer: 500, 1000, 1200 or 1500?
Tools · 7 min
Gundam Marker Types: 6 Kinds and Which Ones Go on Paint
Tools · 7 min
Gunpla Airbrush for Beginners: $45, $81.99 or $481.98
Tools · 7 min
Gunpla Scribing for Beginners: Tape First, Then a $28 Chisel
Tools · 7 min
Gunpla Masking Tape: 1mm to 18mm Rolls, From $2.99 in the US
Tools · 9 min
Gunpla Water Decals: Bandai's 8 Steps, Then a $5 Softener
Tools · 9 min
Disclaimer
Release months and yen prices come from the Bandai Hobby Site: they are Japanese release months and Japanese prices before tax, as listed on the day we checked. US prices are snapshots from named shops on a stated day, and they change. Check the shop's own page before you buy.
Articles are researched and written with AI tools, and every fact is checked against its source before publishing (see How we use AI). Corrections are made in the article with a dated PATCH line.
PlamoDesk is an independent fan resource, not affiliated with BANDAI SPIRITS. The site carries no ads and no sponsored content. Some shop links are affiliate links: PlamoDesk may earn a commission if you buy through one, and that never decides which kits, shops or prices we list (see Affiliate links).